

Tile floors can be a nuisance, regardless of whether you recently purchased the home or simply need an update. Direct installation of tile floors on concrete is the norm. While it increases stability and toughness, it also makes removal more challenging.
It takes a long time and is arduous to remove tiles from concrete. Although not particularly challenging, it is repetitious and can be hard on the hands, joints, knees, and backs. You’ve come to the right site if you’re looking for information on how to remove tile from concrete.
This article will review the procedure, describe the instruments, and present all of your alternatives for correctly removing tile floors. In this blog, you will know how to remove tiles from concrete floors easily.
Quick Access
Is it hard to remove tile from concrete?
The actual removal of tiles is not a challenging task. Although it takes a lot of time and can be physically taxing, chipping ceramic or porcelain tiles is not very difficult. After the tiles are gone, removing the mastic or mortar can be more challenging and time-consuming.
Tile cannot be taken out simply. No underlayment or subfloor can be pulled up and thrown away, unlike tile on cement board or wood. It’s necessary to remove the tiles and glue to remove the tile from the concrete. Tile removal requires patience and effort. It will take at least half a day to complete even a tiny bathroom.
Regardless of your objective, removing tile from a concrete floor may be a laborious and physically taxing process. After removing the tile with a scraper, you frequently have a surface covered in tenacious thin-set or mastic, which can be much harder to get rid of than the tile itself.
Can you streamline the procedure by using any shortcuts? Not, except for paying a pro to complete the task. But if you’re up for the job, here are some suggestions on the finest equipment, supplies, and methods to utilize to safely and efficiently remove concrete to the bare minimum.
You can complete the process more quickly and effectively if you know what kind of tile you are removing from the beginning. Make sure the vinyl or linoleum tiles you’re removing from a concrete floor didn’t contain asbestos if they were put in before 1980. To increase the insulation value and fire resistance of vinyl floor tiles, manufacturers once mixed asbestos into the material. These tiles’ installation adhesive can also contain asbestos.
Only an expert in asbestos abatement should remove asbestos tile since disturbing it during demolition might pose a major health risk. The tile could also remain in place and be covered with a concrete overlay.
Best tools for removing tile from concrete
The best case scenario is to have everything prepared and available before you start the procedure. However, what exactly that “everything” is will depend on how you want to remove it. Let’s consider the possibilities of how to remove ceramic tile flooring from concrete.
Gear for Personal Protection
To protect yourself from flying debris, dust particles, and tiredness, you’ll need things like eye protection, dust masks, gloves, knee pads, and other personal protective equipment (PPE).
The majority of these are available at any home improvement retailer. Additionally, you can locate them wherever hardware supplies are offered. You should expect to pay between $25 and $65 for complete protection.
Chisel and Hammer
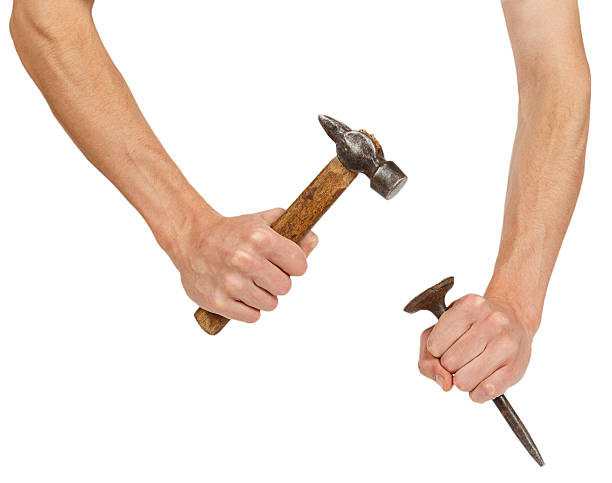
You must chip away at the beginning of the process to start it (and even to end it). The best tools are a regular chisel and a drilling hammer, which is a tiny sledgehammer.
If you do purchase a set (or individual chisels), make sure to acquire a 34 to 1-inch chisel because the majority of chisel sets come in a variety of sizes. It will be advisable to strike the chisel with a drilling hammer. These small sled hammers cost roughly $10.
Chisel Powered By Air
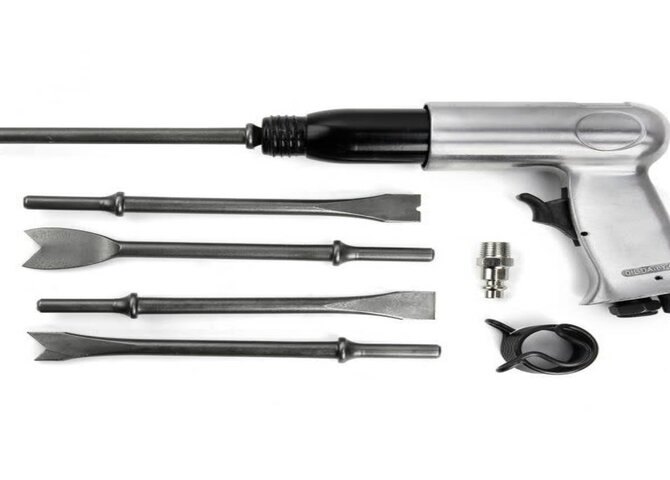
A power chisel will be useful for powered tool jobs (big spaces). Air chisels are quick, simple to use, and can speed up the procedure if you have an air compressor.
However, air-powered tools are pricey, and if you don’t already have the essential gear, you can find yourself paying more for the air chisel than on the entire floor.
Floor Scrubbing Equipment
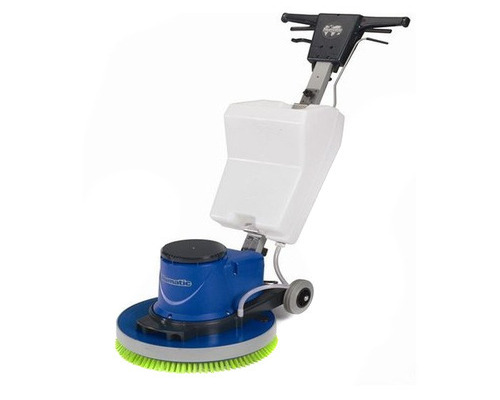
Floor scrapers are perfect for exceptionally large areas, people on a greater budget, or those who need to save time. Even in rentals, a powerful floor scraper will cost you a lot even though it might save you hours.
Heavy machinery includes floor scrapers. Although there is no requirement for a license to operate, some users may not have the necessary skills or technical knowledge. Rental prices often range from $150 to $250 per day.
Dry or Wet Vacuum
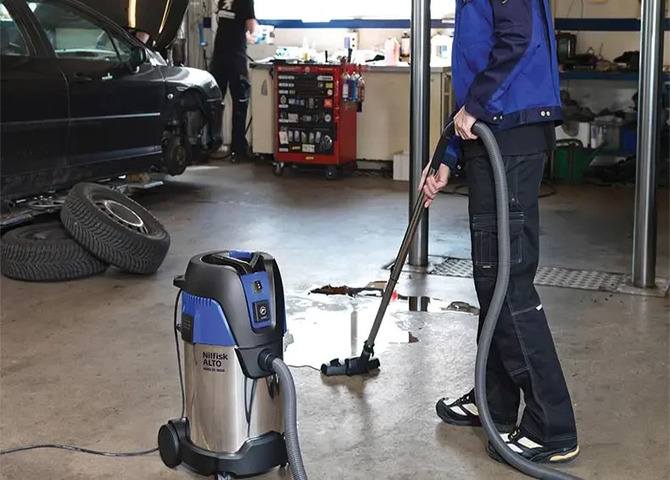
A shop vacuum can manage the larger particles of debris that can damage a normal vacuum. You can even clean up dust if you use a filtration-equipped wet/dry vacuum.
Of course, a regular vacuum might also work, but the fragments of tile could damage canisters or break vacuum bags. For the bigger trash, it is better to use a shop vacuum first.
Cleaning Products

Towels, brooms, mop heads, and floor cleaners will complete the tidying up and enhance the appearance of your new flooring.
Make sure the cleaners and tools are appropriate for the sort of flooring you have. This covers the ideal mops for the grout and adhesives you’ll be utilizing, as well as the best vacums for tile floors.
Basic Concept you need to know for Tile Removal From Concrete
The fundamental concept of tile removal may be stated in a few simple steps, even though the real process and processes are more complex and complicated.
Let’s have a look at the fundamental procedure before moving on to the more complex part.
- The beginning: Selecting a starting location is the first step. Next, remove the first tile using a hammer and chisel.
- Keep chiseling: After removing the first piece, you keep doing so until the floor is gone.
- Detach the mastic: You must take off as much of the adhesive (mastic, thin-set, etc.) as you can once the tiles have been taken out.
- Relevel the floor using a thin-set, mastic, or other concrete leveling agent to prepare it for new tile.
- Add a fresh tile: You can lay the new tile per the manufacturer’s directions after leveling and drying the floor.
Best ways to remove tile from a concrete
Removing Tiles by yourself
The process is rather simple if you have opted to take on the project yourself and are prepared with all of your tools and PPE. One thing to bear in mind is that this process will take some time.
It can take hours to do the job, even with power tools and floor scrapers. Bathrooms and other small spaces can easily consume 6 to 8 hours of your day. Larger tasks could take several days. Make sure you have everything ready for that and have the room blocked off to prevent any disruptions or traffic.
Select a starting point:
Finding a weak place is the first step in any tile removal project. This could be a tile that is already loose, a spot where the grout is missing, or a tile that has a crack in it. If the floor is otherwise flawless, you might need to start at the room’s edge and take off any molding to reach the tile’s edge or bottom. Start chipping away with your chisel and hammer until the chisel can easily reach beneath a few tiles. You want to strike firmly but with control. You should avoid using a chisel since it can break the concrete and remove pieces of it.
The chisel point shouldn’t ever go straight down into the concrete again once you’ve removed your beginning point. From here, you go to the subsequent stage, enlarging the beginning area.
Expand the area:
As you may guess, it takes a lot of effort to chip away at the mortar that lies behind the tiles. From your starting point, you should move outward, chiseling and removing tiles and mastic along the way. It can be beneficial to pause every few feet and clean the debris with a shop vacuum. You’ll be able to see where you are, what is left, and whether you missed any regions by doing this.
Take frequent breaks and drink plenty of water because this part of the task is harmful to your lower back, knees, and elbows (and your hands if you do it all manually).
After removing a few feet of tile, you can use power tools, floor scrapers, or air chisels to finish the job. Start under a tile and move slowly at first until you feel at ease with the tool and how quickly it works.
It’s time to pick up the hammer and chisel once again for some final cleanup work once all the tiles have been removed and vacuumed up.
Tile Mortar From Concrete Floor Removed
Clean the area thoroughly with your vacuum so that it is simpler to see what is still there. Likely, several locations don’t quite reach the concrete. The hardest and most tedious aspect of the process is removing the mortar. It will take some time to manually go over the area again to flatten, remove, and decrease the adhesive level to the concrete.
With this phase, there are two things to keep in mind. First off, you don’t have to be perfect if you’re only re-tiling the floor. Your fresh mortar will assist in leveling the floor and laying the foundation for brand-new tile. However, you don’t want to leave behind so much that you have to raise the base mastic by several inches.
Second, you should be extra picky about the floor if you’re installing a new kind of flooring, like luxury vinyl planks (LVP) or engineered hardwood. Renting a floor scraper to make sure you are left with nothing but level, flat concrete may be time and money well spent.
With Thin-Set Latex, level
You need to clean the flooring quite well after removing the tiles, adhesive, and mastic. Making the new glue stick better can be achieved by vacuuming the floor to eliminate all dust and debris. It’s time to put fresh mastic after the floor has been cleaned. The most common type of latex mortar is a thin set. It is simple to use, dries quickly, and sets up well for both second coats and laying tile. Additionally, it aids in leveling the concrete.
The thin-set can be placed using two or three coats to give a good equal and level surface if there are any sections of previous mortar you missed, cracks in the concrete, or other uneven regions. Lay a thin layer of thin-set (approximately 1/8 inch thick) using a 12-inch trowel.
The thin-set, mastic, or adhesives will also be used when laying the new tile.
Put on fresh tiles
You can install the new tile once the thin-set or mastic foundation layer has been applied and cured. For this procedure as well, thin-set works best because it is much simpler to deal with and keeps its shape better than mastic. Whatever adhesive base you choose, make sure to thoroughly grout after allowing the mortar to cure and spacing your tiles.
After the grouting is finished, you can vacuum, sweep, and mop the floor before utilizing it.
Tile Removal: Manual or Mechanical
Which is preferable for removing tile—by hand or by machine—has long been a debated topic. The battle between man and machine continues even if we no longer live in the Paul Bunyan era.
A combination of the two is the superior choice. Although hand chiseling is difficult and time consuming, you are considerably more accurate. It is therefore advisable to manually remove the old tile and mortar when you initially begin as well as around fixtures, appliances, and cabinets.
The machine chisel, which can be either an air chisel or a floor scraper, can be slid in once you have created a significant removal area. The tiles can be swiftly removed, but doing so makes a bigger mess, releases more dust and other irritants into the air, and increases the risk of damaging the concrete below.
Move slowly and deliberately when removing tile and mortar with machines. Stop using the power tools if you start to feel uneasy, and go back to chiseling by hand. The process can take longer, but the outcome will be better, and you’ll cause less harm to neighboring goods.
Changing the Type of Floor After Tile Removal
The procedure will be slightly different if you intend to take out the tile to install a different kind of floor. It will also change depending on the kind of flooring you intend to put in.
For instance, carpet needs flooring. Although it is possible, it isn’t always a good idea to put the carpet pad directly on the concrete. Although plywood subfloors are relatively inexpensive and simple to install, you must first make sure that the concrete is clean, undamaged, and level.
The tile may not even need to be removed from other floor types. For instance, floating flooring includes LVP and laminate planks. Without any preparation or difficulty, you may just install over the already-installed tiles.
Professional Options for Tile Removal
There is no guilt in hiring someone else to complete the task. A qualified contractor will be equipped with the necessary gear, frequently sends a crew to complete the job quickly, and can clean up after themselves.
You can hire a professional if you don’t have the necessary abilities, motivation, or drive. Naturally, you’ll have to pay for it. According to estimates, the average price for removing tile floors will be $9 to $19 per square foot (including clean-up). You should budget roughly $300 for the floor removal for a 120-square-foot space.
Notably, this excludes installing the fresh tile. If you’re looking for a contractor, you need to find a credible company.
How quickly can tile be removed from concrete?
The quickest way to remove tiles is likely to be with an electric floor scraper. These powerful machines quickly remove tile floors. Typically, they can minimize the workload by at least 50% and finish a project that would have taken 8 hours in less than 3 hours.
However, they are expensive to purchase, and day-to-day leasing fees on bigger projects can add up quickly. They won’t work underneath counters, clean toilets, sinks, or other fixtures, and they’re not the greatest way to begin the eradication procedure.
Conclusion
Removal of tiles from concrete requires a lot of time. Occasionally, it is advantageous to leave the tile in place and add new flooring on top.
Tile removal is a straightforward process when it is not the proper thing to do. Chisel a few tiles, then use air chisels and power tools to remove the other ones. You may anticipate spending approximately 2 hours for every 25 square feet if you choose to complete the project by hand. Double that if you take off the adhesive as well.
But once you’re done, the floor will be solid, level, and prepared for new flooring to be put down.
m. –